


Yes, I've two books to complete...(sigh.... lol - how fun!)
One being the December Daily, and the other a smaller almost matching book which is going to be the 'Companion' to my December Daily (30 days of lists) - an experiment this year!
You can read the whole idea behind this HERE over on a post just for December 30 Days of Lists'
You can read the whole idea behind this HERE over on a post just for December 30 Days of Lists'
I started with these:

Here in this post its all about this December Daily!

It's a bit bumped and bruised from its life time of obvious use...
and when using a vintage book to alter - this may be what you might find...

Some gold book corners to the rescue.....

Then the spine needed some drastic measures:
(Even more evidence it has definitely been a much loved read and constantly re-read book)

So with a matching piece of ribbon and some fabric glue...
......fixed that problem...

Then it was about getting the cover decorated!!
I love a 'door' effect! And these Prima ones are perfect!
Love the shape of them, kinda sympathetic to the era of the book

Out came the gold and blue paint to bring the doors to suit the book cover a little more.
You can compare with the picture above what I changed - kept the 'shading' while painting the gold, put in some black pen definition and then painted with the blue
You can compare with the picture above what I changed - kept the 'shading' while painting the gold, put in some black pen definition and then painted with the blue

The one thing I kept being bothered by was that the doors looked 'cut-off' down the bottom
and no matter how I tried to rearrange them with embellishments...
they were still plain 'cut-off-short' looking!
Rectified that.... with a chipboard add-on...

Now painted, and with some embellishing to cover the join,
it looks much better elongated!
These embellishments are just 'sitting' there, not stuck down...
hmmn...havent finished with them yet.
These embellishments are just 'sitting' there, not stuck down...
hmmn...havent finished with them yet.

With some Dimensional Magic, coated the pine tree and the holly and berries.
Finished off with a bright glitter star, a bow, some gold lace and the wording -
it takes the focus off where the bottom of the doors were joined.
Then touched up the paint too.
Some little gold numbering on the door becomes the year.

Before starting into the daily scrapping, my book still needed some serious work for
'guttering' in the spine. One side is the inside cover, and the other is the first page of the book.

This is 10cm wide tape

Then glued that first page to the cover side by flipping the page over
and now it reveals two blank pages and using some stripey 10cm washi tape
to do another strip along the spine to strengthen it more

Next is what I've been thinking to do and hoping it will turn out okay!
Creating a little window to see through....
love this Bobunny see- through film strip

Three frames is wide enough for the book...
and measured the size

Cut out to reveal the title of the book underneath:

The title page revealed.
I've painted out the cataloging print guff etc to make a frame for a photo.

Now stuck in place and lifted to see the underneath....

Now with that done, its time to start the pages!
Firstly, like a book there are plate pages, and forewords etc...
I've still followed it, trying to be sympathetic to the whole 'book' ideal...
On the left hand side on now what is the inside cover, I've written a
little spiel about picking blue cloth covered vintage books and working
by two books together (Dec Daily and the 30days of lists)
Then on the right is the window page with a sneak peek at the title.....

The title page: gessoed and painted, the reverse side of the window on
the left hand side and luckily the title fell in line with Paige's very
last Christmas concert with her much loved singing teacher of 11
years... they sung carols so this was perfect to personalise the
title.....

Next is the 'Foreword'
I wouldnt have kept this, however I could not believe the words!!!
Other than blotting out a couple of words, it was a perfect introduction for readers to see!
Priceless! This tag was made a couple of weeks ago for a blog event, and it was perfect here.

Now... ready to begin the daily pages!!
At last!
December 1st:
Products (except angel) are Teresa Collins Tinsel and Co. which can be found at Scrap Therapy
How cute is that little felt candle!!

Day 2
I managed to get some very wide washi tape (green stripe and red dot) from a little shop called 'Little Paper Lane'
it's in Sydney, and I 'think' at the moment it may be sold out, but
ask if she could get more in if you want it because it's super awesome
(has heaps of narrower washi too!!) It's especially good for my book
where there is a little bit of 'guttering' down the centre.

The alphbet is a Kaisercraft 12x12 called 'Timeless Collection - Script'
It's big and bold and fabulous!
So cut out the letters needed and placed the two words over the two pages.

Day 3
This tape isnt washi, more a plastic packing tape - it can be found at Ribbons Galore
It's a stronger tape which is needed for a huge 'gutter' down the middle.
It
really does a wonderful job at holding things together for future
use!
The pages are painted to take away some of the 'busy-ness'

Day 4
The tape has been run across the page here as there was a tiny tear at
both the top and bottom of the page where its bound. Instant fix!

Day 5
Watercolouring is a great way to produce a muted background and shadowing to images,
or to balance out colour across a page. Build a photo into the Christmas tree for a bit of a festive look to a non-festive pic.
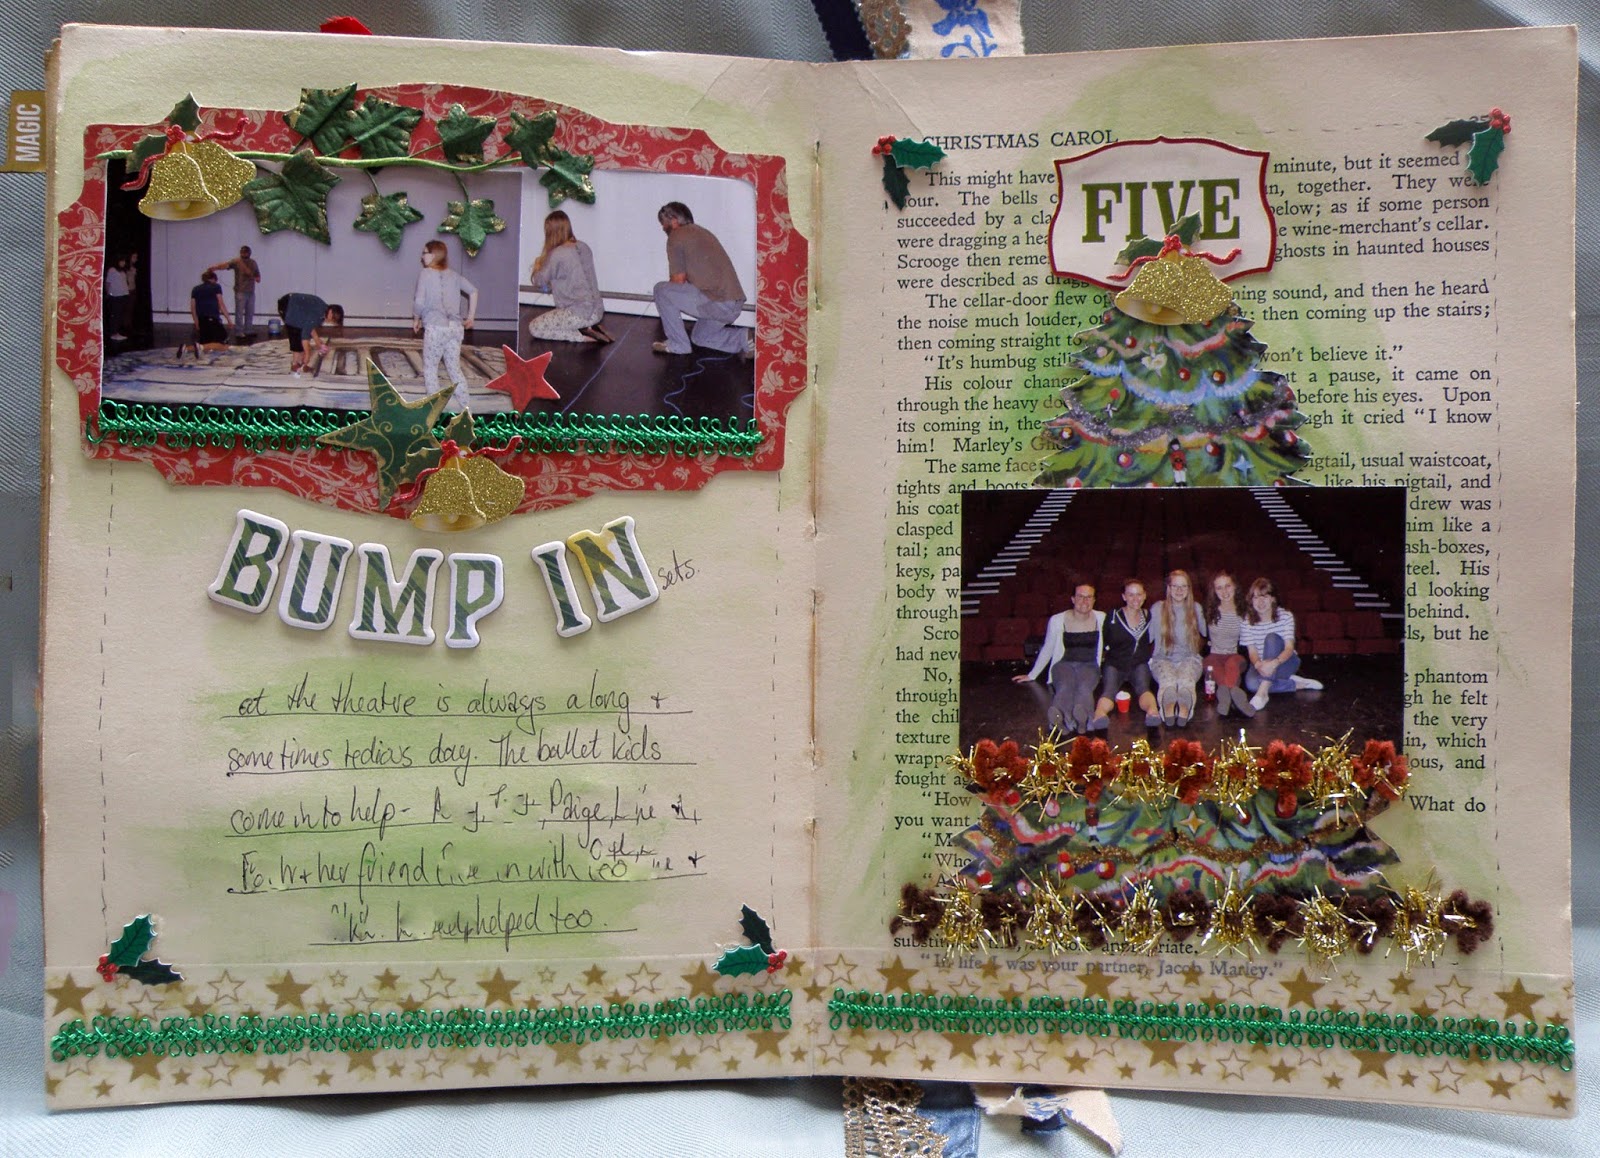
Day 6
This day was HUGE... we had so much on and I really wanted to capture a heap of things..
First is 'The Nutcracker" As we had three acts - I did a page for each
act (with transparency inserts) and finished with Paige's 18th birthday
- yes all on one day!
The book afforded the use of multi-pages, so took advantage of it.
I would think that Christmas Day will also be over a few pages too :)
Day 6 - page 1
Love the use of Tim Holtz 'Snow Tree' die
especially when using glitter paper! The 'skater' is a diecut (came in a
packet) which was just plain pattern paper. I've given it definition
by drawing in lines, added in facial features, painted white, glued on
lace and trim and used an ivy rubon.
The cape is the original pattern of the paper.

Paint over print to calm it down and mute the background so the handwriting is easier to see.
A little bird rubon is a nice little festive touch


Day 6 page 2
Because there were many photos to use, I've created two transparency insert pages.
(Step by step is included below)
(Step by step is included below)

Day 6 - page 3
The trick is to make sure your front pictures match exactly your back
picture so when it flips over, its all squared up and plain backs of the
photos on reverse arent shown. If there is overhang like the bottom
photo on the right... colour it and use for journaling :)
It's also lovely to get a peekaboo at photos on the other pages.

Day 6 - page 4
I didnt have a matching photo (on the top left) to match the back to the front ,
so instead made a frame, and added journaling.
so instead made a frame, and added journaling.

Here's how its done....
First the guttering in the spine needed addressing with the wide washi tape.
The transparency is a 12 x12 made by KaiserCraft and
cut down to two pieces to fit inside the book pages. The pieces are just resting here.
(Transparencies are so hard to define when photographing!!!)
cut down to two pieces to fit inside the book pages. The pieces are just resting here.
(Transparencies are so hard to define when photographing!!!)

Run a bit of contrasting washi tape down one side....this is the reverse side of the washi tape...
tear off a strip and placed it face down, then press the edge of the transparency to it. I find it an easier way to keep the edges 'straight' when adhering one to the other.
tear off a strip and placed it face down, then press the edge of the transparency to it. I find it an easier way to keep the edges 'straight' when adhering one to the other.

Then stick down on the left hand side page near the spine with the transparency flipped to the right.
(The washi is right side up and the transparency is in reverse)
(The washi is right side up and the transparency is in reverse)

Once stuck down, flip the transparency to the left and run another piece of washi tape along the edge so both sides are finished off and adhered well in place :)

Then repeat the same with the other side.
I've made it so the brighter side (the face up side) of the transparency is the centre page. As with most transparencies, the face side up is more defined in colour and image, and the reverse - not so much.

Here's how it looks at the base (if you can work out what I mean)
I've held the left side up and the right side is flat.

Left side about to be flipped and the other just resting open.

Day 6 Page 5
I've repeated the sticking in of another transparency (only one this time) on the next page.
The word 'then' is actually there for the last page - but it also works for this page too..
Thats the great thing about using transparencies...
there are so many ways to make the most of see-through embellishments, photos, words etc.
The word 'then' is actually there for the last page - but it also works for this page too..
Thats the great thing about using transparencies...
there are so many ways to make the most of see-through embellishments, photos, words etc.


Day 6 - page 6
Again, I didnt have a matching backing photo for the top left hand side, so attached a journaling card.
The word 'Then' with its intended use - Paige's birthday.
And see those little tabs sticking out of the top photo....weeeeell......

Already with too many pages for the 6th, tabbed and stored Paige's 'night' out with the senior ballet dancers under the top photo - works a treat!

And like with any scrapbooking project - you make up the rules... or better still - dont have any!
LOL!
Day7
Used a very dark brown gelato, and some inks for the background.
The little blue stars are cut from a piece of very inexpensive
Christmas chiffon fabric that caught my eye and the result is a great
little embellishment. Tip is to keep an eye out for fabrics, they can
often serve as a wonderful alternative and something different from
scrappy products.

Day 8
Underneath the photo on the left, I've used a negative strip of star
music paper left over from punching out little stars. By placing a piece
of blue seam binding underneath, it helps for the negative image to
stand out and another way to create an effective embellishment.

Day 9
Two clear transparent frames were created here to become full page sequin shakers.

Cut some frames, and clear transparencies to size

Sew (or glue) the frames to the transparencies

Then sewed the photo on the outside of the frame (there's a reason for this)

One of the things we dont want is for the sequins to get stuck under the photo, or congregate there so the effect of the shaker page is lost. So it's a matter of spreading out the sequins first to the surrounds of the photo. Then glue the underside area of the transparency where only the photo sits ...(and the outside frame) and press down over the top of the carefully placed sequins on the page. Then the sequins are restriced to the outside area of the photo can shake all around it.


Day 10

Day 11
Using some hung tags can be effective


Day 12
The products on this page have been sent by Lee-Anne at Scrap Therapy...fabulous Teresa Collins range of Tinsel and Co. The paper background - white cardstock and 'Stars Paper' and the gorgeous little tag is '20 Emphemera Tags' Alpa and words are 'Alpha & Label Stickers'.
I'm totally in love with the sequins.. love the stars (below), but also the oversize round ones that come with the stars in gold, white gold and red..
And how fabby is the green trim for my shelves found here I actually ironed it flatter so closing the book would sit a bit better.

Day 13
On the right, an inexpensive Christmas trim has been used as a background....
I've drawn a bit of a curly frame underneath it.


Day 14

The little vertical window on the right is a long oblong piece cut out of the page
and replaced with a transparency.
(Here, two pages are stuck together for stability to hold the 'transparency window' better)


Day 15
It's a nice idea to go around the decorated parts of your house and take pictures, it will be a great memory if you move house or for future generations.
This part is my dining room... and will take the loungeroom on Christmas day.
On the left is the reverse side of the 'transparency window'


Day 16
At last all together... I 'lost' some of my Dec Dailys for the past two years and this week...I found them! Just lost them in our house move. Its also makes a great pic to scrap too.

Day 17
Time for wish lists! You might think... hmm, bit old for wish lists, but this is both totally practical AND scrappy planned! First off, being the sixth December Daily... the contrast between what the girls wished for 6 years ago have certainly changed and with each passing year. They have already giggled over their past wish lists and about what they DID end up getting, and about the items they didnt which stay on the wishlist now forever! ALSO .... the wishlist is a wonderful resource as a good guide as to what to get them for Christmas too! The 'Wish List' is a stamp I've had forever, and my advice to the girls: nothing too fussy with it, just scribble it out.
The book needed some binding help - wide tape to the rescue!

Some texture underneath the tag

Day 18
I've used some leftover gold doily vellum. For some other project, I must have cut out a gold doily or two from it, but the remnants have come in handy here. It defused the print a bit and its also trimmed around the edges with gold glitter washi tape.


Day 19
Here I've created a little pocket for extra photos which are punched with a hole
and string threaded through


Day 20
Not forgetting the pets. I'm so pleased I've included each pet for every year in my December Daily's.
In previous ones we have memories of our very loved 18yr old Cosmo who
had passed away in 2010, and Blackie is now very elderly, I'm not sure
if he will be with us next Christmas so these photos become precious.
It doesnt take much to make a 'Christmassy' photo with a pet.. just a
couple of baubles dropped in front or a bit of the tree in the
background.


Day 21
Washi tape can make a great background, and so do these little chevron bags...
here I've put some embellishments poking out of the top of each bag, or these could be useful for hidden journaling too.

Inked up and ready to stick down.

Day 22
A dab of paint calms down the print so some hand drawn journal blocks can be seen

Scraps thrown into a container come in handy for little embellishment layering

Day 23
Some more decorations to record - Nutcrackers sure are popular and trending this year!

There's nothing like a bit of glitter for Christmas!

Day 25 Part 1
Christmas is nearly always a big day for December Daily-ers!
Ours is no exception, and we have such a divided day between Christmas
morning at our house, lunch at the in-laws, then a four hour drive to my
parents for dinner in the evening
It sounds like a lot, but we love every minute of it, so when scrapping
the day, it falls into parts, therefore into sets of pages:
Today, is part one, Christmas morning at our house...
First of all I had to fix this big gutter between the pages. I'm afraid
the amount of 'chunkiness' on this old book is taking a toll! As the
next few pages were going to be mainly black framed transparencies,
I've used some black tape to run down the middle to do the trick
perfectly.

1st page
(Photographing the transparencies on the completed pages trying to
minimise the reflection they cause has been very tricky and frustrating -
so I apologise in advance)
You can also see the fixed guttering securing the book a bit more...


(Even the transparencies reflected off each other!
I'm certainly not a proficient enough photographer to conquer this problem!)
Nevermind... anyway: the transparency frames were a little more complex than what you see here...
1st and 2nd pages
You can also see the fixed guttering securing the book a bit more...
(Even the transparencies reflected off each other!
I'm certainly not a proficient enough photographer to conquer this problem!)
Nevermind... anyway: the transparency frames were a little more complex than what you see here...
1st and 2nd pages

There actually is a middle page in between the Christmas Eve on the left, and the picture (somewhat obsured) of my three girls on the right. A rectangular piece was cut from the middle of this page and used a transparency frame to cover the space (old Hambly overlay)
I'm not sure if you can see this well, but the photo of the girls is actually on the 4th page (if you count backs and fronts) , and above it is another smaller transparency frame, so behind that on the sixth page, is a photo of decorations hung on the fireplace... seen right through from the 1st and 2nd pages.

Pages 3 & 4
Here's the reverse side of the retangular transparency page, the photo of the girls on the 4th page and the photo of the mantel decorations seen through on the 6th page behind.

Maybe this photo is a bit clearer to make out the see-through pages?

Pages 5 and 6
And ho ho ho, on the left hand page (page 5) - the girls are looking down at their presents with the bottom part of the Christmas tree in the background, yet if you look up to the next frame (which is the photo of the tree on page 1 ) - there is the top of the Christmas tree- like it was photographed in full! Would love to say I was that clever at planning that - but (sigh) it was a happy accident!!
Dont you love it when that happens!!

Phew.. that was a hard one to photograph and explain, I hope it made sense.
It looks a treat in real life and I truly love the use of see through and peek-a-boo pages.


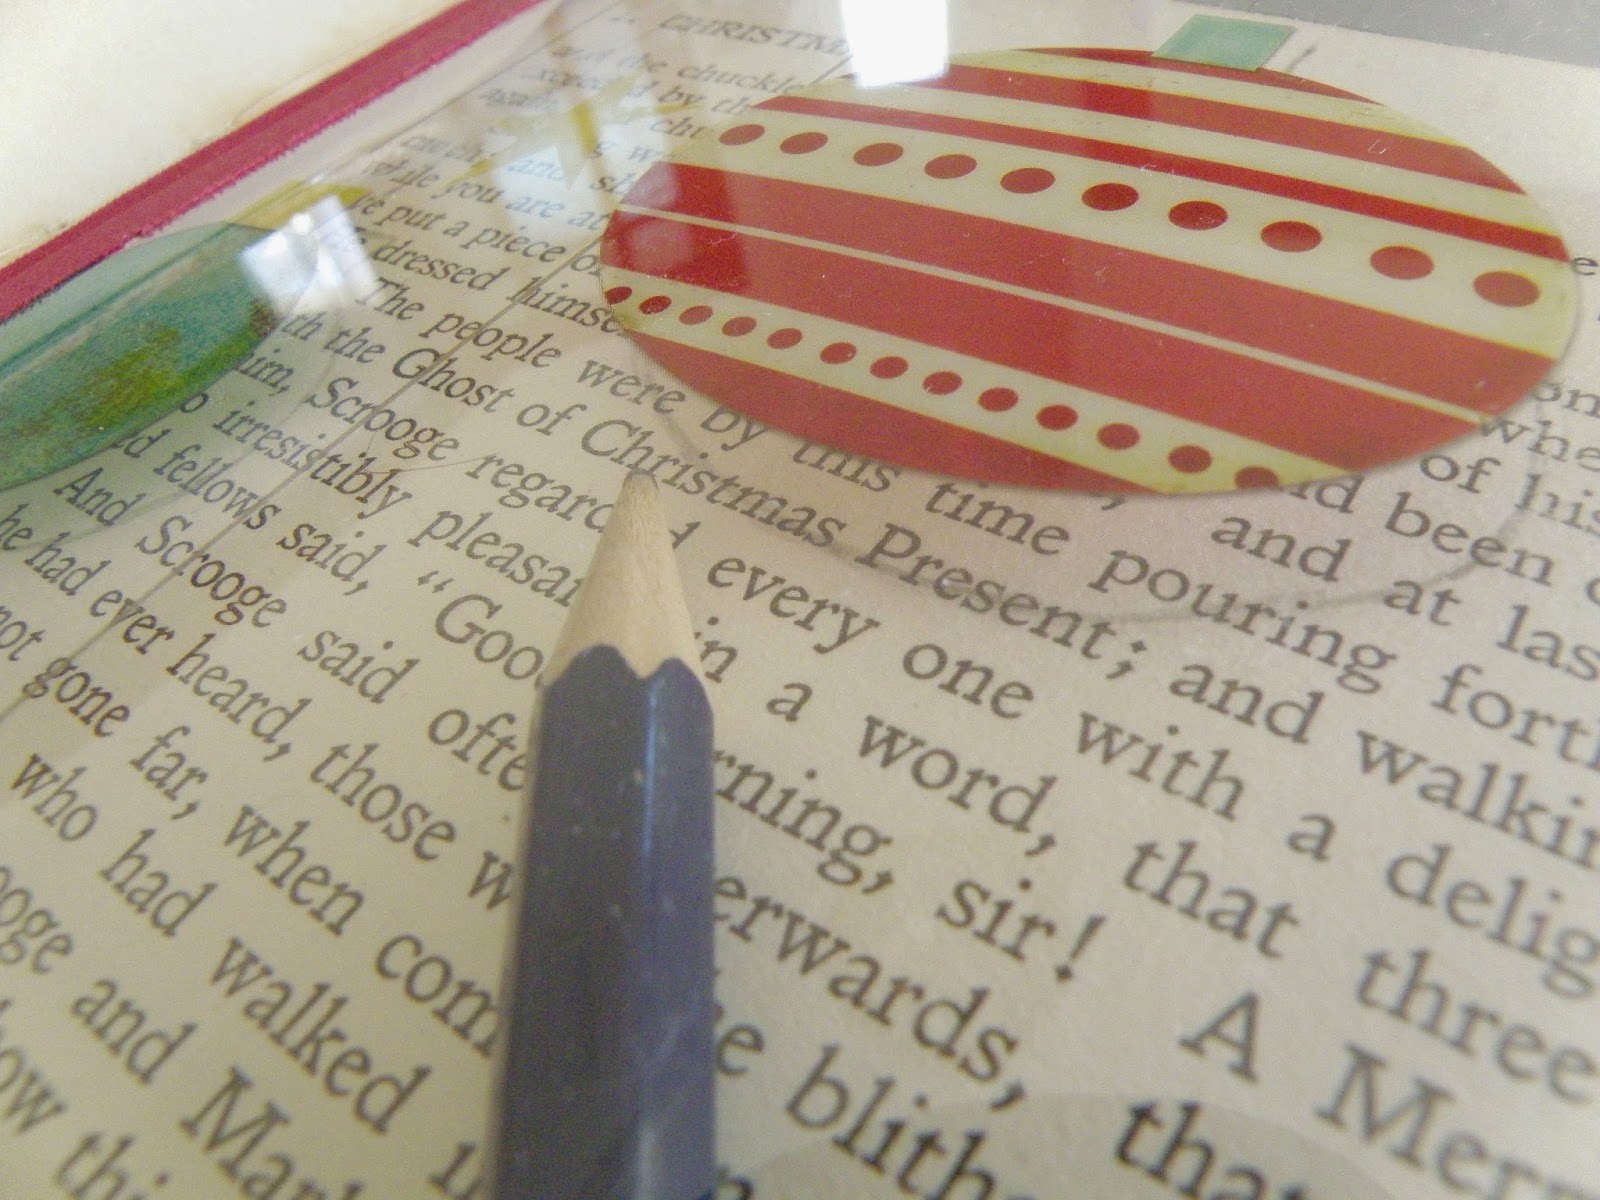
More festivities under the flap


I kept measuring where to trace by using particular placement of the letters underneath compared to the shape on top... you can see the words 'Christmas Present' is where the bottom of the bauble is for example, and by the end... it worked!


The transparency page now flipped over to the left


And ho ho ho, on the left hand page (page 5) - the girls are looking down at their presents with the bottom part of the Christmas tree in the background, yet if you look up to the next frame (which is the photo of the tree on page 1 ) - there is the top of the Christmas tree- like it was photographed in full! Would love to say I was that clever at planning that - but (sigh) it was a happy accident!!
Dont you love it when that happens!!
Phew.. that was a hard one to photograph and explain, I hope it made sense.
It looks a treat in real life and I truly love the use of see through and peek-a-boo pages.
--------------
Day 25
Part 2
Another couple of double pages, firstly for lunch with
my husband's lovely family and then our long drive to Part 3 of the day -
dinner with my family....
I found a box of old rubons (rubons are not usually my friend!!) and
gave it a go (with the thought that there is GESSO if they didnt
work!!!) But they did and looked a treat!
The bottom right hand photo doubles as a pocket for more pics with twine tied to them for ease of pulling them out.
Normally I wouldnt take pics of the drive down (right hand side) but it
hailed! Yep, hailed! So used some little white sequins to represent it.
Day 25
Part 3
On the left hand side is a canvas flap, with some photos underneath, and the right hand side is a cut down fancy pants transparency page (need to look closely to see it) attached by red canvas tape.
On the left hand side is a canvas flap, with some photos underneath, and the right hand side is a cut down fancy pants transparency page (need to look closely to see it) attached by red canvas tape.
More festivities under the flap
Attach the transparency by two pieces of tape, one each side of the transparency
Now that the transparency is fixed, I want to lift up these little
baubles a bit and trace them with pencil *exactly* to their shape
underneath to use as journaling blocks....
I kept measuring where to trace by using particular placement of the letters underneath compared to the shape on top... you can see the words 'Christmas Present' is where the bottom of the bauble is for example, and by the end... it worked!
The transparency page now flipped over to the left
This is the final day scrapped for my 2014 December Daily.
Day 26th
Boxing Day
was another big day which happened in parts over two double pages.
The girls headed out early to the sales, and finished up with a big family BBQ!
This was such a happy day - it needed bright happy colours.....
so coral and yellows and greens feature :)
By the evening we were celebrating with some very dear old friends and getting very weary...
And the diecut phrase on the right was so appropriate to finish the album!
It's been 'window' framed by trim too.
It just so happened to be fixed onto the back board page of the book...
just the right amount of papers! Luckily I wasnt going past the 26th!
And as the story of 'A Christmas Carol' (the basis of my December Daily) its also come to a close on with its last paragraph or two - there were some fabulous festive words to highlight.
And as the story of 'A Christmas Carol' (the basis of my December Daily) its also come to a close on with its last paragraph or two - there were some fabulous festive words to highlight.
Little gemstones gave the diecut phrase some colour and richness...
The journey has come to an end for my December Daily

What a delight it has been creating it from a 1929 book of 'A Christmas Carol'
----------------------
Superbly beautiful - you are such an artist! The doors and embellishments - what can I say? Truly amazing, I'm so in awe of your talent. And it all looks as if it's been like that for ever. So looking forward to seeing what you're going to do inside.
ReplyDeleteLooks great...fabulous start. Those doors are diving & the companion book looks like an 'interesting' idea! Let the innards begin, I say!!!!!!!!!!
ReplyDeleteTotally fabulous. I love those little door extensions.......how clever. These 2 little books are definitely meant to be together.......they are both going to look wonderful.
ReplyDeleteWow wow wow!!!! These are AMAZING!!!! LOVE THEM!!!!!!!
ReplyDeleteWow Missy love these and those doors. Awesome.
ReplyDeleteWOW! The covers look great! well done!
ReplyDeleteThese are so beautiful! I really love that the original vintage book covers and titles still show through, and that Mandy's embellishments simply enhance the natural beauty! Such a clever look with the doors and tree, and love the elegant trims and details. Wow!
ReplyDeleteHow brave of you to alter a book Mandy...I haven't yet been able to do that. I love how you worked around the existing title and those little door are just too cute! You ladies do the most amazing things with all your stash!
ReplyDeleteThis is amazing! I love that your DD journal is an altered book! I took the "guts" out of my book and regret it now that I see this awesome inspiration! I'm getting my ideas together and can't wait to join in for 2015!
ReplyDelete