

Finally to reveal my cover.....................................

I chose to use the Kaisercraft Kraft Journal for my December Daily. I just loooooove Kraft.

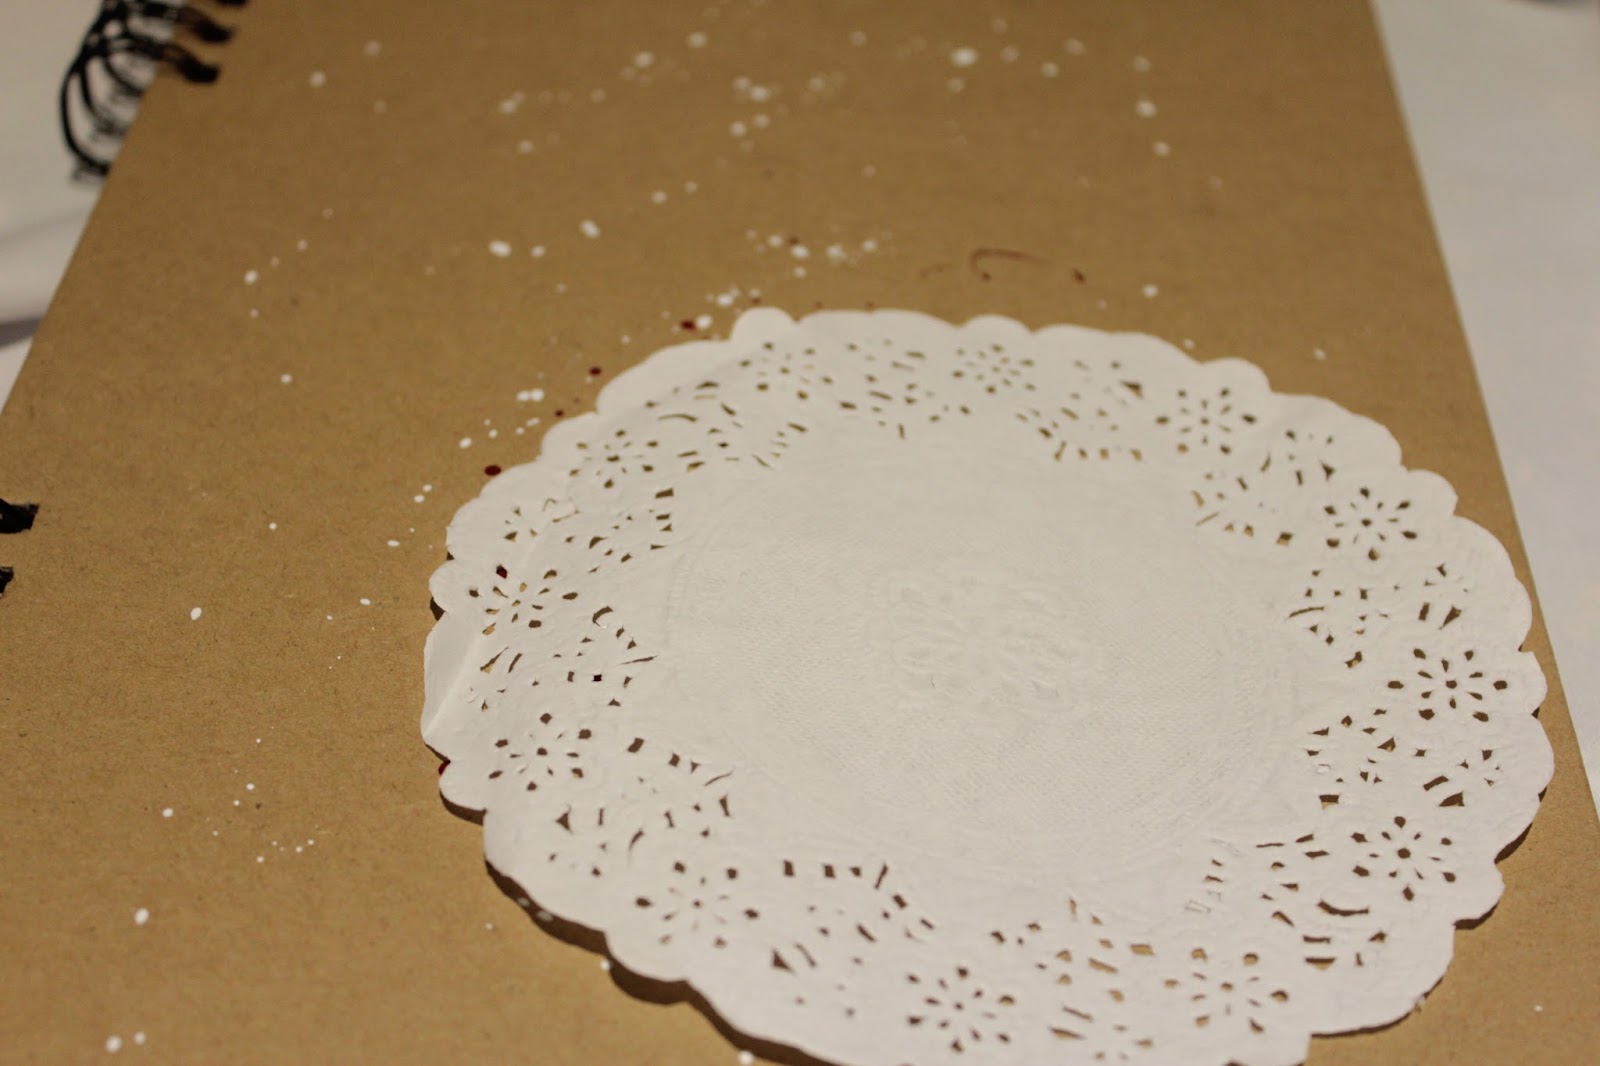
To get the paint splatters with a deep rich colour, I used the Mister Huey's spray and this colour is Plum Thumb. I take the nozzle out with the top and flick the paint on the end, onto the book cover.
For the bigger blobs, I make sure there is a lot of paint on the end and hold vertically for the paint to drip off the end.
For the bigger blobs, I make sure there is a lot of paint on the end and hold vertically for the paint to drip off the end.

The same process with the Mister Huey's Calico White spray. They are a solid colour, so no shimmer or transparency.

Playing around with a doily and decided I liked it in the bottom corner of the cover.
Scattered some sequins and glued them down............................

I also used the end of the Mister Huey's spray tube and drew with it, the lines around the edge of the cover. Not neat or straight. Quite scratchy.
On top of the doily I placed 3 cut outs of the journal shape, in 3 different sizes in different papers. One in Gold glitter. Another in one of the papers from my stash of October Afternoon papers and then a plain white one on top.
Adding the word December using Candy Cane Stripe Thickers over top of the 3 layered pieces.
Adding the word December using Candy Cane Stripe Thickers over top of the 3 layered pieces.
To finish off I scratched a black pen around each letter to help it stand out a little more and around the edge of the top white journal cut out.

To trim it off I tied some string and gold beading trim to the top ring of the spirals and left it long to fall down the side of the journal.

Oh what fun I've had with this 'flat' December Daily so far.
My pages will be prepped as I go as I'm wanting to keep the pages in theme with what is happening in my photos. I don't want to jump too far ahead.But some pages I've been able to prep before hand.

As the pages are 19cms x 29cms I've cut a heap of the papers down to 18cms x 28cms and covered the pages with a little of the Kraft peeking out. I haven't done every single page though. I've skipped some pages so I can create my own page with mixed media.

I've inked the edges of the pages with a black ink.

And some of the pages I've prepped with clear Gesso ready for some paint, ink, gelatos etc.

Here I've used a water soluble crayon and scribbled in 2 corners.

I then wet it using a water spray bottle and moved it around with a brush.
I added some white water soluble crayon and some texture paste through a star stencil for some added interest.
I noticed on this page it was curling because of all the wet medium, so I attached a piece of scrapbooking to the back to flatten it out.

Added some stamping of Christmas words on the edge of some of the papers.......

Here I've used a white gelato through a circle stencil and used my finger (while the stencil was still down) to move the gelato around the inside of the stencil.

I cut out 3 layers of a Christmas tree and plan on adding more detail to it soon.

Again, some gelato through the star stencil and blended with my finger........................

Remember that Christmas tree I started?? Well this is what I did...............

Some texture paste through the star stencil, some green gelato to enhance the green of the tree and some black Faber Castell Pitt Pen to add some shading around the tree. I've also used a Tim Holtz Christmas stencil to add the words 'Jingle Bell' and 'Christmas' to the page.

Day 1..........
I mounted the 2 smaller photos onto black card to make them pop from the page, while the larger photo is mounted in black photo corners. My journalling is on a Kraft tag with some added red seam binding.

Now while I didn't have black photo corners, I used the white ones that I had and changed the colour of them with a charcoal ink pad.

Day 2.............
The 'Tinsel' photo is double mounted on black card and then gold glitter paper for added POP. And the use of washi tape to add some interest.
The numbers I cut out on my Cameo in a black cardstock, nice and big.

Day 3..............
This page was stencilled and not covered in paper, so I mounted the photos again on black cardstock and added some washi tape and some cute little stickers from the Under The Tree (October Afternoon) sticker sheet. I drew a black line around each bunting.

Day 4..................
Quite a simple page. I flicked some red and gold mist/spray onto the page and mounted the photo in the photo corners.

Oh my! Getting close and getting busy!
Day 5..............
Using a word type background paper I added some splotches of colour with the gold and red mist sprays.

And good old washi tape to accent on the photo...............

Day 6....................
Using my gelatos/water crayons, I threw a bit of colour on the background in red and white, then stencilled over top with the star stencil and some texture paste. I painted one star in gold and outlined it with a black fineliner.
Again, photos matted on black cardstock to make them pop off the page a bit, a doily and some cute embellishments to accent the 6x4 collage photo.
Here I used a page to remember what Christmas means to me.
It includes what I remember of past Christmases as a child and growing up.I think at the end of the book I will do this again but 'current' with our Christmas this year.

A paper covered page and I used a little card from the Simple Stories paper and backed that on black cardstock also.

Day 8.................
Here I've randomly put down some texture paste in one corner and while still wet I've added some Mica Flakes. It looks like snow.

Added some cut out baubles and bows..............

Day 9...............

Day 10 holds the very important letter to Santa.
I've covered an envelope in papers from my stash and stuck it to the page with double sided tape.
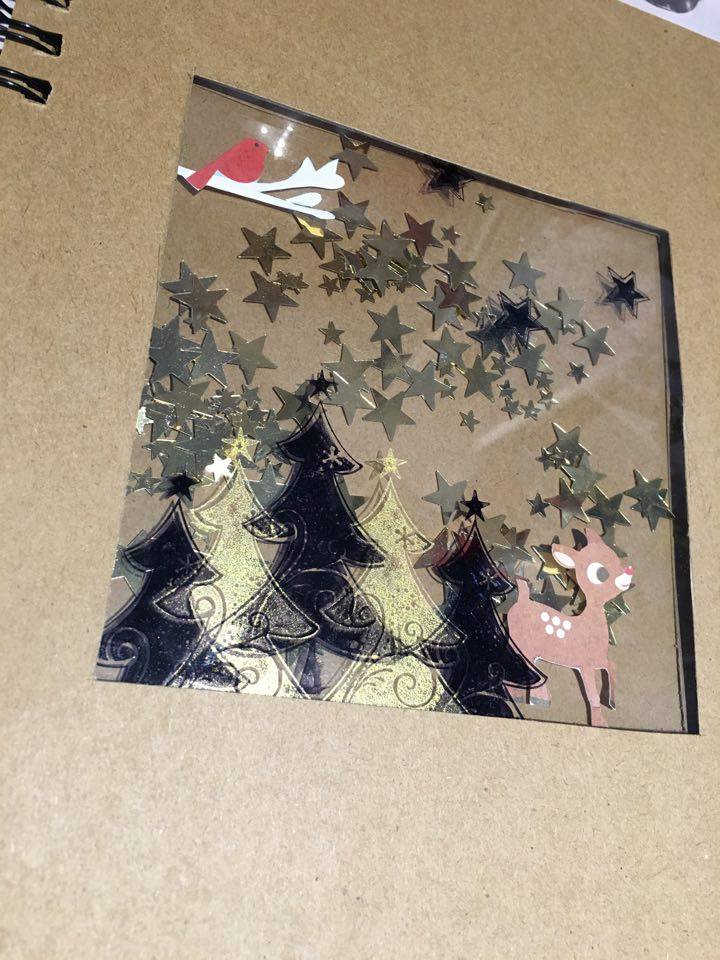
Window/Shaker pocket page ...........
I cut out a window exactly the same size from 2 pages next to each other. They need to match up as I sealed the 2 pages together.
I cut out some acetate to fit the windows and adhered them to the inside of the 2 pages on both windows.


On the right page window I added some foam tape around the edge of the window.........

I then chose stamps that I wanted to use..................

Using Staz On ink I stamped the images like a scene on the acetate on the inside of the 2 pages so I could go over the edge of the window and it didnt matter.

I then added stars, a deer, and a bird in a branch to the right side window which will act as the window.........

And then closing the left page on the right page, stuck the 2 pages together on the foam tape and made a window with moveable stars and deer behind the stamped trees.
This page was the second page in Day 10.
I just used 2 different washi tapes to make a Christmas tree shape, tearing the tape longer each time I went underneath the previous strip.
Then I decorated the tree with bauble stickers, a photo and some little alpha letters describing the event in the photo................................

Day 11...................
Kept quite simple. Using the doily to ground the number of the day. Washi tape and Thickers used for colour.................

Another doily used on the opposite page to tie the two pages together for Day 11. A sticker banner and Thickers again.

Lots of layers on Day 12 and a white doily. My photos are still mounted on black card and using the black photo corners.

I decorated the window with a little bird sticker and some washi tape to 'frame' the window. ...........

I positioned the photo on the previous page 'in' the window so it can be seen when the page is turned.

The annual Santa photo is kept simple to make the photo the focus of the page.
I then wrote some journalling on a tag, attached some red seam binding and slipped it under the photo to be pulled out to be read.
I then wrote some journalling on a tag, attached some red seam binding and slipped it under the photo to be pulled out to be read.

Well my day 13 was pretty plain but I wanted to keep it simple and stand out more. So straight in with photo corners, some journalling on the blank white bit at the bottom and add a wood veneer LOVE word.

Day 14.............
Banner chipboard stickers to add some interest to the one photo I took for the day and using a tag for some journalling.

Day 15 Spread over two pages..............

Simple black mount and some shaped tags for journalling. I added the number of the day onto gold glitter card.


I also used some texture paste and an awesome Tim Holtz Christmas stencil of holly and pine needles with pine cones and scattered the images over the pages to break up the colour on the background pages.


Day 16 Spread over two pages also.....................

The background was randomly stamped using a 7 Dots tiny star stamp. I then went over the stamp randomly with a Tim Holtz sweater stencil with red Pan Pastel for a little colour.

A favourite photo gets a whole page to itself with random left over pieces of patterned paper and some gold glitter card and a doily.

Day 17...............
Photos backed onto black card again. Tiny alphas to label the subjects in the photos and some words and Christmas quotes cut from the papers I have.


Day 18.............
I documented the food I bought for our Christmas Day.

I made a little pocket to store the receipt for it. Will be interesting to see in years to come the price difference from todays shop.

I also documented the activities and tasks for the lead up to our Christmas. Making gingerbread houses and preparing strawberries.

Day 19.............
This is our Christmas Day. A week early due to my brother going overseas for Christmas.

I had so many photos from our Christmas, as you do, and I like to put in most of them, whether they are good or bad photos.
So I used a piece of Kraft A4 card and trimmed it just slightly.
So I used a piece of Kraft A4 card and trimmed it just slightly.

I added a strip of washi tape down the left edge of it and lined it up on the page. I then folded the washi tape over and joined this page to the page in the book, so it folds over.

I opened it up and ran another strip of washi tape down the join to strength as it will be opened and closed.

This is the previous page where I joined it to.

And this is the cover of the folded page.
Very simple with some stamping and a doily because inside is sooooooo busy.
Very simple with some stamping and a doily because inside is sooooooo busy.

This is the folded page opened and the two page spread. Very simple stamping again for the background. And some tiny alphas to describe what is happening.

I also documented what was happening in the local area at the time.


This is the other side of the folded pages which I kept as the final page for this day by using the group photo as the final photo.

Inside the right hand side folded page. Using polaroid photos from my Instax camera was great as there is a white blank space at the bottom to write on. That is where I documented who was in the photos.


Day 20....................
Love the photo corners. Still using my large black numbers I just mounted the photos in photo corners. I journalled using my handwriting straight on to the page and used some Thickers for the subject of the day. There is a little stamping using Christmas words and words that describe the day.

Day 21..........
Some red & white striped background paper with some star stamping randomly placed over the background and used to ground the photo.
Some 'wishes' word stamping around the photo and some random strips of paper, words and ephemera placed around the photo and some wood veneer stars.

Day 22............
I didn't have any photos for Day 22 so decided to use the blank page to reminisce and remember special moments and highlights of the December days already gone.

Day 23...........
The photos are again matted on black card to help pop from the Kraft page. I've used a little washi tape to adhere the photos to the page. Some journalling on a piece of patterned paper stuck behind the photo and some little chipboard stickers and wood veneer embellishments.

Day 24...........
Day 24 is a double page spread. I only had 2 photos from Christmas Eve because I was so busy, but planning ahead wanted a double page spread for Christmas Day.

So to fill the page opposite the photos I made some Christmas Trees with Gelatos and Texture paste.


I first randomly put some texture paste through a stencil all over both pages.

I drew some triangles to represent Christmas Tree shapes and filled them in with a little Gelato in red, green and gold. I used my fingers to blend the Gelato to cover the tree.

I did that in all 3 colours.

I then used the Christmas word stencil and blocked off the words I didn't want by using masking tape on the back over the words. Turned it the right way round and stamped through the stencil with a black ink pad randomly on the trees.

To help make the white texture paste in the trees more white after adding the Gelatos, I used a baby wipe and wiped in circular motions on the texture paste to remove the colour.
I then ended up with this.......................
I then ended up with this.......................
Day 25...........
I had quite a few photos of Day 25 and I knew I did when I was doing Day 24 so made it a double spread.
On the left I had Christmas morning with some photos of unwrapping presents, but I wanted a photo of the 'after' with all the wrapping paper and presents everywhere. Just to document the fun that was had.
On the left I had Christmas morning with some photos of unwrapping presents, but I wanted a photo of the 'after' with all the wrapping paper and presents everywhere. Just to document the fun that was had.

I used a background sheet of patterned paper and some washi tape to stick the photos down. A photo of each person in our family. (Other than me because I take all the photos.)
I also adding a chipboard word 'Christmas Morning' but left it raw to flow with the Kraft paper.
I cut out some holly leaves from patterned paper and bent them up a little for dimension. I also drew a black line around the edge to help them stand out.

On the other side of Day 25 was the afternoon. Describing what was happening with some tiny alpha stickers and washi tape to adhere the photos. I also wrote our names directly on the photos with a black sharpie to add some interest.

Day 26......................

Photos mounted on black card and the background was splattered with the red spray. The photos are a story like sequence with alpha stickers used for the description and a tag for the journalling.
 .
.
Here's my finished 2015 December Daily. I found that I didn't need to go back and do anything more as I created most of what I wanted on the days as I went along.

Although it has ended up fanning out a bit chunky even though I scrapped pretty flat it's not too bad, so I decided to leave the spiral on. Otherwise, I was thinking of lacing it with ribbon.

This format of December Daily I found great although wish to have done more with mixed media, but I found mixed media very time consuming and as it got closer to Christmas,
I was becoming very time poor.
I would definitely like to do this format again in the future. Scrapping flat was appealing, so maybe a flat book again or maybe back to my Project Life style with more
homemade pages and shaped pages.
I will also make sure that I get someone else to take some photos of me at Christmas time opening presents, baking, cooking, creating etc. and not just the posed photos with family members. (oh and to try and include photos of my camera shy 15yo son.)

Looks amazing bec - like a wonderfully festive december is exploding all over the book cover - loads of fun here!!
ReplyDeleteBec, your cover looks amazing. Just LOVE the "splatter".
ReplyDeleteLove all the paint splatters against the kraft coloured cover and the scratchy lines tie in perfectly. Stunning explosion of Christmas happiness!
ReplyDeleteOMgosh this is so darn cute :) I now know I need white mist after seeing this! I love how you have the splatters on the over and the way you streamed some out that look like sparks :) A beautiful start to the Daily :)
ReplyDeleteThanks Tina. It was fun to use the ink in that way.
DeleteLooks like fun!
ReplyDeleteIt was fun Kirsty!!
Delete