

THE KIT AND IDEAS
Hullo there!
I'm excited to share with you some ideas I have for
my December Daily this year.
I learned a LOT from last year's attempt including this:
* I am NOT going to prepare specific spaces for my photos.
Last year, they either didn't fit or I wanted room for more.
* I WILL have a bigger book.
Last year it was 6" x 4" & I had a tough time creating extra space.
Since I am an 'Op Shopper' [junk, recycle and charity shops are my go-to
shopping places!], I had an assortment of books to choose from
already in my stash.
I have gone with the pink one
at the front, sized at 6.5 x 8.5".

* I WILL re-cycle / up-cycle & use as much of my Christmas
pizza box of stash as humanly possible.
I'm looking forward to the challenge of creating for the WHOLE
month of December with Christmas holiday bits.
Let's see how I go!

* I won't bother with a colour scheme. Too hard when using up stash.
*Because I know there is going to be a riot of colour, I am thinking
of using ALL black and white photos ~ we'll see about that one!
* If nothing is happening on certain days, I'm going,
to use the 'be thankful' list from ELISE.
This is based on her November daily journaling list from
her blog 'FEED YOUR CRAFT'.
Finally, I WAS going to leave my
mess STASH, I mean, in the pizza box.
But realised I'd never find anything.
So I sorted it out. That was a HUGE job!
I left the patterned papers in the box.
Here's the rest, all separated up:
 The groupings include:
Trims
Die cut shapes
 Animals
Trees & flowers
Bling
Words / alphas
 Pictures [mainly of Santa!]
& lastly, stars.
--------------------------------------------------------------------------------------------------
THE COVER
Hey there! It's uncovering the Cover time! YAY!pizza box of stash as humanly possible.
I'm looking forward to the challenge of creating for the WHOLE
month of December with Christmas holiday bits.
Let's see how I go!

* I won't bother with a colour scheme. Too hard when using up stash.
*Because I know there is going to be a riot of colour, I am thinking
of using ALL black and white photos ~ we'll see about that one!
* If nothing is happening on certain days, I'm going,
to use the 'be thankful' list from ELISE.
This is based on her November daily journaling list from
her blog 'FEED YOUR CRAFT'.
Finally, I WAS going to leave my
But realised I'd never find anything.
So I sorted it out. That was a HUGE job!
I left the patterned papers in the box.
Here's the rest, all separated up:

Trims
Die cut shapes

Trees & flowers
Bling
Words / alphas

& lastly, stars.
--------------------------------------------------------------------------------------------------
THE COVER
So far, this has been my fave bit. MUCH more fun than sorting mess stash out;)
TA-DAAAA!!!

Originally it looked like the Travel diary that is was!

Cos I'm a lazy toad, I didn't want to bother with Gesso or lots of mixed media.
Also, cos I KNOW it will sit in a book case, the cover needed to be FLAT.
And because the diary had too many pages inside, as I was ripping them out, I had a
light bulb moment.
USE one of the INSIDE pages on the OUTSIDE COVER.
Thus:

And already I'm using my Chrissy stash with that old washi tape
I ALWAYS use glue with washi - PVA is fine.
So, that formed the basis of my cover.
Then it was simply a matter of pulling out Other Stuff.
I had made a pile of Christmas trees [punched out] with my Grandboy
one day.
We'd gone to a hardware store and collected a pile of paint chips:

Which became this part, using a paint marker to outline them:

The 'joy' was fussy cut from wrapping paper:

And also glued down with PVA glue:

Then the little house had a roof that was NOT the right colour:

So I coloured it green with my ink marker!
Had a little card with a sweet Chrissy saying - more fussy cutting!
Did you know I HATE HATE HATE fussy cutting?
I'll be complaining all December, I bet!


And my 'modus operandi' is, if it's not working....ADD MORE.
I added some more bits and bobs, so my cover looked more cohesive.
SNORT!
Oh, I wished I believed everything I write. Please don't!
Basically, I plonked stuff down to fill the gaps.
Stars are GREAT.
The title is using old alphas.
Can you see one of the "e's" in December is actually a
reversed number 3?

Next I covered the whole lot with Mod Podge.
Of course, any Matt or Glossy Medium or even PVA glue will do the trick:

As I was doing this, I got another flash of inspiration.
And added just a smattering of glitter.
Here's another look at my finished cover,
so you don't have to bother scrolling back up the top!

Et voila!
-----------------------------------------------------------------------------------------------------
-----------------------------------------------------------------------------------------------------
THE PAGE PREPARATIONS
Hullo there! Today I'd like to share how far ahead I've gotten
on the inside of my daily.

Basically, I wanted to cover up the words on the pages.
They said 'date' and 'location'.
Fine for a TRAVEL diary....but not a December Daily!

And there were way too many pages. And they were quite thin.
Firstly I ripped out lots [kept some spare, that I can pull out
if I don't use by the end of December].
Then I used my glue stick & stuck 2 pages together for strength.

I used washi to cover the writing:

Then tossed up with just leaving the lines.
But to strengthen the pages a bit more,
& because I've a pile of odd Christmas papers,
I decided to use them up:

I've covered about 40 pages. And to be honest, haven't got much
paper left at all. GO ME using stuff up!!
From a full 12x12 double sided patterned sheet, I got 3 full pages,
plus 2 odd bits left:

At this stage, I had one of those 'DING!" moments.
Because I couldn't paste paper right to the edges of my diary,
because of the metal rings,
I came up with the idea that I could
MIMIC the idea that the papers
I'm actually ADDING to my Daily look like they've been
RIPPED OUT from somewhere else.
Thanks to having an edge punch with that look, it worked.
Distressed the punched edges before gluing in:

I'm definitely thinking black & white photos now.
There is SO much colour and pattern in here already. EEEK!
Next thing was I needed to be able to identify each day easily.
I made some tabs!

I've only put day 1 in - as I'm not sure how many pages
I'll use for each day.
They were easy to make.
Fold a piece of paper in half:

I used a tiny banner punch.
Leave the folded bit FREE of the punch:

You can use the same technique with any punch, really.

Next, I stamped the numbers on them.
Remember, do all your '1s', then '2s' etc. all at the same time.
It makes it easier that way:)

And finished!

Here's a shot of the book once more:

Not super exciting, but ready to go!
--------------------------------------------------------------
DAYS 1-3
It's been a busy start to December for me. But today I've caught up!


--------------------------------------------------------------
DAYS 1-3
It's been a busy start to December for me. But today I've caught up!
On the left side of my 1st page, the inside cover,
I stuck a paper bag already decorated that had been gifted
to me. It's so beautiful & I thank Kathleen Wilson VERY much:)

I decided to pop a little letter in about WHY I was doing this album.
I'd also been given some number stickers from Mary Bennetts, & realised a number '20' & '16'
made it into 2016. That was useful! The typewriter image is from our local
Reject Shop. Marked down to 50c for 6!

On the other side, I used digital files from the Becky Higgins PROJECT LIFE App
I have on my iPhone. It's a 'cherish' card from the 'DREAMY EDITION' kit.
I simply print them from my iPhone, via my wifi printer at home.
Then I used my STASH [go me!!!] to decorate the card.
The arrow was a 'bauble' die cut. I'm not being precious. I wanted that paper,
& decided to cut an arrow out of it. Then I THREW THE LEFT OVERS AWAY.
Yes. I am YELLING. This feels good. Use it, then lose it ;)

My completed 'intro' pages spread:

Next up is Day 1.
Initially I thought I'd only use 1 page per day. Whoopsies.
Took 2 pages to scrap my 1st day. Oh well. I kept spare pages in the book.
So that's OK!

Sticking with the black & white photos. Although it's HARD.
I'm a writer. I'm writing directly onto my iPhone, & also printing straight from
my computer. Then cutting out the sentences to 'fit' my page:

Yes! There are silver snowflakes on these pages,
from Marie-Christine from LAST year.
They're cute, but in Australia it doesn't snow at Christmas. So I took a deep
breath, & simply plonked them on the page as decoration:

To get my smaller photos, I also use the Project Life App by Becky Higgins.
You can pop 2, 4 or 6 photos on a 4x6 photo sized card. This one is a 4 per card
size. Then you print, and cut up! You can pop them onto a usb to be printed, but
doing them at home means I have more chance of keeping up with my DD.
I backed the photos with some stash wrapping paper:

You can see I'm keen on writing ON my photos, too.
Partly 'cos the background paper is quite 'busy'.
Mostly 'cos that's what I like to do! The Stampin' Up or American Crafts journaling
pens write well on the glossy surface.
As you can see on Day 2 below, left:

The other thing that works for me is making little 'flip' folders.
You simply run some washi tape between your photos [I use glue as well,
cos washi tape has a habit of NOT sticking terribly well].
On the left hand side, I've made one and journaled on the inside as well:

Excuse my big toes getting in on the act. Had to hold it open somehow!
Note the little stapled star cluster underneath? I repeated this element on
the other page [Day 3] for continuity.
You'll also notice with the little alpha stickers below, I'd run out of the letter 'e'
so used the number 3s instead. The 'i' is a 'j'...strangely, I don't think it looks
at all odd. Did YOU notice??

I could go on and on with all the little bits I've added. But you've
been remarkably patient if you've gotten this far.
One last thing. Notice this photo has been altered with red arrows?
That's my 'LITTLE MOMENTS' App for iPhone by Fatmumslim.
It has LOTS of different effects you can use. And it's a fave.
Like this 'transparent' effect that I've used for the arrows, below:

Last but not least, a big thanks to Lizzy Crust, for sending me some extra
Christmas bits from HER stash that she thought I could use. I already have!
Hi there! Powering along & so far pretty much


DAYS 7 and 8.


Another 'thankful' day:


Today we got a HUGE Christmas basket of goodies delivered.
I immediately ate a YUMMY Fudge cookie.
I wanted to use the card & the cookie pack in my DD.
Here they are:


Nothing tricky on this one. Except I THOUGHT I'd finished
it, then decided to add an extra something!


Another 'simple' day. I used a big bell behind the photo,
along with some sequin waste & stapled it together.
Staples are marvellously useful tools!


I've noticed the bottom of my book is bulkier than
the top. So on this day, I used layers behind
my photo & popped it on foam up the top of the page to try to
make it more 'even':


Day 25
Christmas Day.


-----------------------------------------------


Day 30
I used 3 small photos. Tilted to fit!
The background paper was already stuck down,
and it was too dominant.
So I added a tag to pop my journaling on.
Used up the silver glitter alphas again:


We'd love you to share all your processes
and December Dailies with us
HERE:
keeping up with my DD!
---------------------------------------------------------------------
DAY 4 & 5:

For Day 4, I used a photo that I snapped
from a magazine. Since I was watching the new Gilmore Girl
series - I figured it fitted. We don't always have to use 'LIFE' photos.
Sometimes a representation of what we're doing like this works just as well!
I've done a 'flip' here, too, as I had lots of journaling.
No surprise there. You lift UP the photo to
reveal this.... & yes! I know 'is' is spelt with a 'z'.
But I had no 'S's' left. Being creative ;)

The tabs are working well - but I realised I needed the dates
on the BACK side of them as well.
Couldn't be bothered getting out the stamps again, so I'm just
writing them on with a marker.

And who said you can't have a deer checking out the girls?
I think he looks cute! I'm enjoying using those little word
stickers around the page. I made them myself on the computer.
Finding free typewriter fonts is pretty easy with Google!

Onto Day 5.
I had a quiet day at home.
And as planned, am using the Thanksgiving List
from Elise for those days.
This one was for a family member.
It wasn't until I'd FINISHED my page I realised
it was a COLOUR photo. WOOPS!
It's because it's an older one, not taken for my DD.
So, I've decided for the THANKS days - I'll always
use a colour photo. I quite like the idea, as it will separate
daily doings with reflective thanksgiving!

I've used lots of bits. Fussy cut the little girl and boy
silhouettes; some tags, & the 'love' on the side is part of a card that also
had 'peace' and 'joy' on it. Worked a treat here!
I don't mind that it overlaps the edges of my diary a little at all:)

I cut the vellum tag below from some paper I had in the stash, and wrapped a little copper
thread underneath as well:

Close up of my journaling. I'm REALLY enjoying mixing the typed with the written!

---------------------------------------------------------------------------------
Day 6:
 Back to using my Project Life App by Becky Higgins.
This time with 4 frames to the 4x6 photo size.
2 of the frames have used the Digital files
from the 'CAPTURE LIFE' kit, which was a freebie.
Then I printed the whole lot using the black and white feature on my printer,
to keep the colours muted.
Decorated the non-photo pockets.
And where's my journaling you ask?
Tucked BEHIND the photo this time!
The 'pull' tab you can see on the left, the scalloped 1/2 circle
that says 'love'.
 So, that's it for me.
Getting into the 'flow' of it now.
--------------------------------------------------------------
This time with 4 frames to the 4x6 photo size.
2 of the frames have used the Digital files
from the 'CAPTURE LIFE' kit, which was a freebie.
Then I printed the whole lot using the black and white feature on my printer,
to keep the colours muted.
Decorated the non-photo pockets.
And where's my journaling you ask?
Tucked BEHIND the photo this time!
The 'pull' tab you can see on the left, the scalloped 1/2 circle
that says 'love'.

Getting into the 'flow' of it now.
DAYS 7 and 8.
Still been mighty busy here!
For day 7, I used a photo of our Writers Group Luncheon.
I know that sounds fancy. We USED to meet and write.
But now we just meet and talk!
This page sits besides day 6. I like the balance
when one day has smaller, lots of photos, then the other side
has a single one like here.
Notice the sequin 'ropes'. Thought this was a good
way to use them as decoration!

I've used a tag to decorate behind the photo.
Here's my journaling and top of the tag.
The word embellies come from that Christmas stash.
How PERFECT!

The star below covers the back of 2 staples from the next page:
I made them myself. Simply added a good dose of PVA glue to white cardstock, then sprinkled with assorted glitter.
Leave to dry, then cover with more glue so it all stays put.
Cut with your die cut machine into any shapes you choose:)
The yellow 'enamel dots' are Ranger 'Enamel Accents'
in a little bottle that you squeeze out. I love them
cos you can make them any size you want!

Day 8:
I forgot to take a photo of 'us' today.
Ooops! Was obv having way too much fun!
However, I DID take ONE photo which has had
to become a 'representation' of my day!
Once again I've used my LITTLE MOMENTS app
on my IPhone to add the words to the photo:

I had already made some little sequin shaker packets.
FINALLY got to use one here.
I made them too big for my page/photos
OOOPS! So I tucked the top under the photo.
Also had to cut the Right side off, then re-seal with the gold washi tape!
Then, for added security, I stapled it in place, as you can see below, on the top Left:

I used my FUSE TOOL to make these packets. HOW TO:
1: I found some old 'DIY' alphas, with sticky BOTH sides of them,
This isn't necessary, it's just I wanted to use these up!

2: Not convinced they were still sticky enough, I used the BOSTIK
glue below to stick them to my plastic pocket.
The 'e' had been coloured but not used previously. That was
fine. It made it individual!

3: Next, I gathered all the packets I'd prepared and fused them
at the same time, using my hand made cardboard
board with lines on it so I can fuse in a straight line!
Hold the plastic in place with washi tape:

4: Fill with sequins, then seal the last side with
your fuse tool.
You can also use stitching [hand or machine]
or even washi tape to seal your pockets, if you don't have
a fuse tool:

The plastic is from old but good quality plastic sleeves. Worked a treat!
How observant are you?
Did you notice the 'v' in love is the same letter as the 'u' in laugh?
And the 'h' is NOT an 'h'.
This is a GREAT way to use up those alphas! Be inventive!

Maybe you'd like to try shaker pockets in your DD? Of course, once I started I couldn't stop... but that's for a future post!
-----------------------------------------------------------------------
Day 9:
This was a Grand Boy Lucas day. We did LOTS.
So I made a collage up.
My journaling is on a flip, behind the collage, with the little edge
of red on the left hand side the hinge.
Day 9:
This was a Grand Boy Lucas day. We did LOTS.
So I made a collage up.
My journaling is on a flip, behind the collage, with the little edge
of red on the left hand side the hinge.

It's tucked under the photo

and then wraps around the blue pp behind the collage, attaching to the base of the page. The kraft colour is on the other side of the red cardstock:

Getting back to my collage, to create the borders around the individual photos and the outside edge, I used my fave marker. Which works on most-all surfaces

Some close-ups. Below you can see that hinge. The red pictures on the collage are done with the Little Moments App:

The tab below is for opening the folder up, and I've added a silver heart created from a Lindt chocolate box and the paper clip was from a scrappy mate:

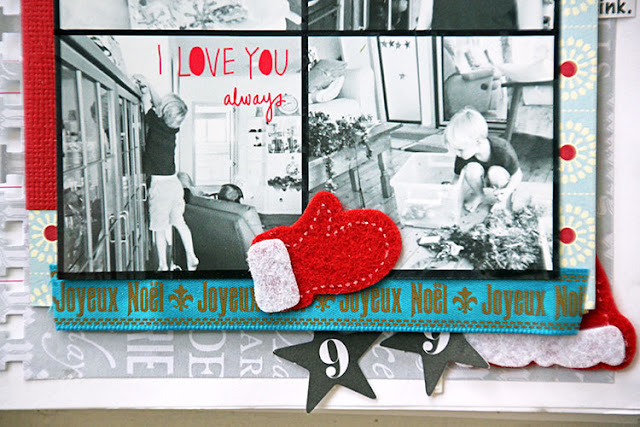
At the bottom of the page I've added some ribbon I was given last year, plus there is a little deer behind the photo. But its legs were showing which looked odd. So I attached some stars:

Inside. More feet photos! How else to half open a flip, I ask? That was rhetorical. You don't need to answer;)

Now you can see the deer in all his splendour. Since this was about Christmas decorating of our house, I figured I could be a bit more Christmassy in the embellies:

-------------------------------------------------------
DAY 10
I knew I was going to use some more shaker packet ideas!
With this one, I actually sewed the top half where the 'laugh' title sits,
down, once I'd popped in the sequins.

Then I added the photo & a few more sequins & sewed that shut too.

This was a 'quiet' home day, so I was back to my
'thankful' list. I googled Frasier. Love that show!
And found a photo that I then added the 'heck yeah'
with my Little Moments iPhone app!
The hearts are all punched from an old Lindt chocolate
box.

The journaling & embellies were added on the top of the plastic.

----------------------------------------------------------------------------
Day 11
Sometimes life throws a curve ball.
I'd DONE my day 10, then we decided to go out.
Dang it! So, the END of the day went onto Day 11's page.
Best laid plans gone astray. Oh well.
I coped!! I think it's GOOD to be flexible
when doing a DD:)

The colour photo at the bottom is 'cos it was also
a 'thankful' day. This time I took a photo
of a book, & once more altered it, adding the 'thankful'
bits about it!!!

The double spread looks like this:

---------------------------------------------------------------------
Day 12
I ran out of room for my date tabs on the side,
so am popping the next days on the top. Just for a change!
I'll go back to the side when the top is full.
I wanted to use some layers behind my photo
on this page. Haven't done that for a while.

Also added lots of little words & even some washi.

Below are some more of my home made glitter paper stars.
I REALLY like the look of tissue paper as a paper layer!

---------------------------------------------------------------------
Day 13
Another 'thankful' day:

Added some star washi to the bottom.
This is also a flip open, using washi for the hinge.
The star is packaging run through an embossing folder
then die cut into a star:
This is also a flip open, using washi for the hinge.
The star is packaging run through an embossing folder
then die cut into a star:

I needed to do a flip, because even though not much happened
this day it was HOT! As in HOTTEST night
on record. Ever! So, I used a bell die cut I knew was
too big for my DD & penciled the word, outlined it then
cut it out to spell....
this day it was HOT! As in HOTTEST night
on record. Ever! So, I used a bell die cut I knew was
too big for my DD & penciled the word, outlined it then
cut it out to spell....

..did you guess? The word HOT!!!!

Using LOTS of old alpahs & bits. Here's the full inside,
toes included!!
toes included!!

'Tis the season NOT to be jolly.
So I simply altered it.
Little bit of a giggle;)
So I simply altered it.
Little bit of a giggle;)

And the whole double:

------------------------------------------------------
Day 14
Now I might've made a bit of a boo-boo for days 14 & 15....


Seems I'm on a "cut them words out that I need & chuck the rest
away" phase at the moment. It's a GREAT way to stash bust!
Here's how I did this for day 20.
I'd been given these post it notes:


can you see what I've done?
It was way too late by the time I realised.
So, it was either go with the flow. Or obsess.
I prefer the easy way out!
So these should be black & white photos.
But they're not.
OOOPS!!!

------------------------------------------------------
Day 15
For day 15, I decided to do lots of my journaling ON my photo;
then added a few strips.
My December Daily has become a reflection on the year
to come as well as current events, it would seem!
And that's OK:)

Day 16 was a doozy.
The journaling on the INSIDE of this half-flip
say it all.
As do the photos!

Here's the flip in relation to the whole page
when open. Thank goodness I didn't
jam my toe! Need it for my photos!!!

Once again I've used a collage, & a black Copic marker
to delineate the photos. Colour on the finger
photos help divide the day I had too:)
Here is the page with the flap closed:

Just in case peeps are a bit squeamish, they don't HAVE
to be confronted with my squished finger!
----------------------------------------------------
Day 17
Day 17 was a thankful day. So was 18.
Needed to rest after hurting myself!
Once more I used the THANKFUL LIST
from ELISE.
I took a couple of photos of how BLUE features in my life!
Once more I used the THANKFUL LIST
from ELISE.
I took a couple of photos of how BLUE features in my life!

These are the Thickers I previously glittered up.
I used the little 'full stops' from the pack as decorations around the page.
And can you see I snuck some ric rac in?
Couldn't resist after seeing the other girls' use it on their DDs!
I used the little 'full stops' from the pack as decorations around the page.
And can you see I snuck some ric rac in?
Couldn't resist after seeing the other girls' use it on their DDs!

Outlining the alphas is an easy way of making your title pop:

----------------------------------------------------------------
Day 18
Day 18 is also a 'thankful' day.
My finger is not infected, but it is quite sore!
Lucky we had a quiet weekend planned:)
'LUXURY' has taken on a whole new meaning!
Notice I've finished the tabs up top, so now I'm putting the
dates back down the side again.
My finger is not infected, but it is quite sore!
Lucky we had a quiet weekend planned:)
'LUXURY' has taken on a whole new meaning!
Notice I've finished the tabs up top, so now I'm putting the
dates back down the side again.

More ric rac. A gingerbread man with a flower sequin
necklet! And the layers behind the photo have been ripped
then stapled. I wanted this page to look more 'loose'
and 'easy'.
necklet! And the layers behind the photo have been ripped
then stapled. I wanted this page to look more 'loose'
and 'easy'.

I'm quite enjoying popping my journaling ONTO the photo.
Especially those that don't matter what you can actually see!
BTW - it's tomato & bacon on toast!!!
The red stars are YEARS old. So good to bust that stash:)
Especially those that don't matter what you can actually see!
BTW - it's tomato & bacon on toast!!!
The red stars are YEARS old. So good to bust that stash:)

------------------------------------------------------------------------------
Day 19
This was a home day. I decided those big bell
die cuts - one I cut up for words previously -
might work on a page after all.
And I remembered to do black & white
today!

Here's the bell & my journaling closer.
I've used the same flower sequins as on the
previous page around its neck.
Applied with Liquid Pearls:

Similarly, I've used the same red glittery stars, too.
Below you can see the photo die cut I was given from a friend.
Simply backed the heart with some silver paper I had.
See the 'to town' words?

They were cut from this PL card.
More stash busting!

I like thinking out of the box!
Here's days 18 and 19 together
- gotta have Wally dog in my DD!

-------------------------------------------------------------------------------
Day 20
Seems I'm on a "cut them words out that I need & chuck the rest
away" phase at the moment. It's a GREAT way to stash bust!
Here's how I did this for day 20.
I'd been given these post it notes:

Adhered this one to cardstock,
then cut out the 'nice' word which I wanted:
then cut out the 'nice' word which I wanted:

Made it into a 'banner', added some black to the border
et voila! Also, the washi below was recycled from a present,
& amp; I've typed onto the photo with my
Project Life app:
et voila! Also, the washi below was recycled from a present,
& amp; I've typed onto the photo with my
Project Life app:

Next, I used this little card. I didn't want the 'Christmas'
word, so cut it away. The 'joy' is a cut from my Brother Scan N Cut
machine. I knew some of the white from the word would still be
visible, & thought this might help cover it up.
word, so cut it away. The 'joy' is a cut from my Brother Scan N Cut
machine. I knew some of the white from the word would still be
visible, & thought this might help cover it up.

Firstly, I cut all the elements out:

Next I thought the words needed to 'pop' more.
So went over all the dots with a white pen.
I added a border as well.
Note the difference to the 'fun' word which hasn't been altered:
So went over all the dots with a white pen.
I added a border as well.
Note the difference to the 'fun' word which hasn't been altered:

I also wanted to add part of this word phrase.
The whole one wouldn't fit on my photo.
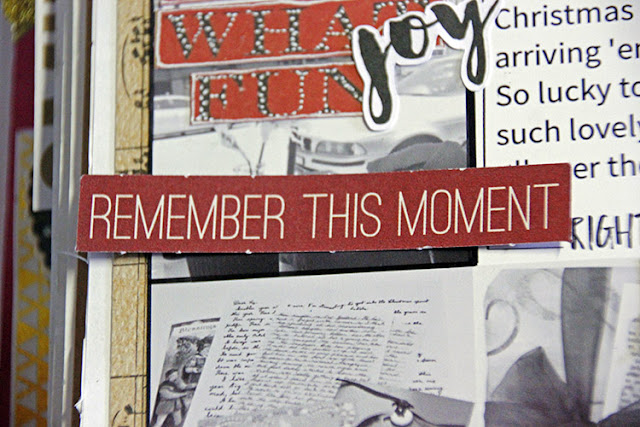
So, I choose the 'remember' word:
The whole one wouldn't fit on my photo.
So, I choose the 'remember' word:

After cutting down, edging with black then white,
this is what it all looks like:
this is what it all looks like:

The 'joy' did its job pretty well!
I hope this makes you think of ways of using YOUR stash too!
Here is my whole page:
I hope this makes you think of ways of using YOUR stash too!
Here is my whole page:

Lastly, a little close up of the bottom cluster.
The 'u' & 'n' are actually both a 'u'.
No one would know!!
The 2 little chevron banners worked a treat, too:)
The 'u' & 'n' are actually both a 'u'.
No one would know!!
The 2 little chevron banners worked a treat, too:)

----------------------------------------------------------------------------------
Day 21
Today we got a HUGE Christmas basket of goodies delivered.
I immediately ate a YUMMY Fudge cookie.
I wanted to use the card & the cookie pack in my DD.
Here they are:

I backed the heart with some patterned paper,

then created a sort of flip folder with the photo & these
2 pieces of ephemera.
2 pieces of ephemera.

It was not closing too well, so I added a
sticky Velcro fastening to help!
Here it is at each stage of opening.
You can see the Velcro dots below a bit better.
sticky Velcro fastening to help!
Here it is at each stage of opening.
You can see the Velcro dots below a bit better.

Then the left side opens to reveal
my journaling:
my journaling:

And finally the photo lifts up to see the
note from our family.
I decorated the opposite side:
note from our family.
I decorated the opposite side:

I must say, I was really pleased with how this
page turned out:)
page turned out:)
----------------------------------------------------------------------------
Day 22
Nothing tricky on this one. Except I THOUGHT I'd finished
it, then decided to add an extra something!

I have lots of the deer that I've cut on my Brother Scan N Cut,
so added one in here. For no other reason than that I could!
Usual trick of drawing ON my photo!
And the Santa hand was used as if he was
holding the photo!
so added one in here. For no other reason than that I could!
Usual trick of drawing ON my photo!
And the Santa hand was used as if he was
holding the photo!

I used up some alphabet stickers below, &
once again used a 'V' for an 'A' & the 'Y' was a 'J'. I then added the 'hook'
with a gold pen to create the 'Y'.
The 'Q' is used for the 'O':
once again used a 'V' for an 'A' & the 'Y' was a 'J'. I then added the 'hook'
with a gold pen to create the 'Y'.
The 'Q' is used for the 'O':

----------------------------------------------------------------------
Day 23
Another 'simple' day. I used a big bell behind the photo,
along with some sequin waste & stapled it together.
Staples are marvellously useful tools!

Can you see what I've added, below? Look on the deer!
I'm really liking the way the number page tabs are working.
I'll do this again :)
And those big stars worked a treat down by the journaling strips:
I'm really liking the way the number page tabs are working.
I'll do this again :)
And those big stars worked a treat down by the journaling strips:

--------------------------------------------------------------------
Day 24
I've noticed the bottom of my book is bulkier than
the top. So on this day, I used layers behind
my photo & popped it on foam up the top of the page to try to
make it more 'even':

Hmmmnnn. It was a lazy day! So out with
my sparkly alphas. Still trying to use 'em up!
And out with the black marker to outline them again!
my sparkly alphas. Still trying to use 'em up!
And out with the black marker to outline them again!

My layers consist of WRAPPING PAPER, TISSUE PAPER,
and the silver foil lining from a BUTTER CONTAINER.
No joking!! Pretty cool, huh??!!!!
and the silver foil lining from a BUTTER CONTAINER.
No joking!! Pretty cool, huh??!!!!

Day 25
Christmas Day.
A big one.
And I really 'had' to use colour.
Luckily, the ex-travel book I'm using had 2 plastic sleeves in
the back of it. I always knew they'd come in handy
for Chrissy photos:

Using the Becky Higgins' Project Life App again,
I've created collage style on my 4x6 photo paper,
then cut them down to size.
The writing is added with my Little Moments App.
This is basically what I did for all 4 pages, with some variations.
Here's another example:
Here's another example:

This 'freed' me to use a black and white photo on the actual day
for Christmas!
We had it out front of our house:

I've got to the stage where my book is FAT!
So I'm trying NOT to do anymore 'flips'.
Instead, I added a journaling pocket at the bottom
and typed my journaling on vellum.
Got to use up a bit of trim along the top:

--------------------------------------------------------------------------
Day 26 & 27
This is a very simple spread.
Once more based on my 'thankful' list.
Both days on one page, as it was R & R
time:
This is a very simple spread.
Once more based on my 'thankful' list.
Both days on one page, as it was R & R
time:

A bit of washi; still using up stars too,
& I even used a Christmas 'sparkle' word on Michael's
photo!
I popped both dates together on washi up top:
& I even used a Christmas 'sparkle' word on Michael's
photo!
I popped both dates together on washi up top:

-----------------------------------------------
Day 28
I think this is the simplest, or most 'CAS' page I've done.
I used my phone app to write ON the photos,
& simply outlined them with a black marker:
I think this is the simplest, or most 'CAS' page I've done.
I used my phone app to write ON the photos,
& simply outlined them with a black marker:

----------------------------------------------------------------
Day 29
Apart from the fact we're in the middle of a heat wave,
there was not much happening. The 'thankful' prompt
was about a 'surprise'.
Took a bit of thinking.
Once again, simple page, 'cos my book is
really thick now!!!
Apart from the fact we're in the middle of a heat wave,
there was not much happening. The 'thankful' prompt
was about a 'surprise'.
Took a bit of thinking.
Once again, simple page, 'cos my book is
really thick now!!!

I'm not sure the Chrissy Bell has much to do with washi or
happy mail. But it looked nice!!!
happy mail. But it looked nice!!!

Day 30
I used 3 small photos. Tilted to fit!
The background paper was already stuck down,
and it was too dominant.
So I added a tag to pop my journaling on.
Used up the silver glitter alphas again:

Day 31
Last day of the month!
And I've gone completely 'CAS'
[Clean And Simple]
Sometimes I think it's as important to show
how you can scrap quick, with no tricks like
flips & other clever things.
'Cos in the end, this is about getting December scrapped!
We'd love you to share all your processes
and December Dailies with us
HERE:
Cheers for now ~ Lizzy ♥♥♥

Gorgeous cover, Lizzy. Love the little Christmas trees and the sprinkles of stars and glitter.......fabulous.
ReplyDeleteSo loving your cover Lizzy! Bright, cheery and extremely appealing, really makes me want to look inside. Love your process and the technique of plonking stuff down to fill the gaps - going to have to try this myself!
ReplyDeletehahaha... fussy cutting!!!! I love it!! Love everything about your cover - it is happy and bright! I love the paint chip trees too! AND the stars! It's all very cohesive!! AND most of all I love how you write!
ReplyDeleteLove, love, love this Lizzy!! A brilliant cover make-over!! .. and look at all that fussy cutting!!! You keep saying you hate it but you keep doin' it!!! LOL!! I love the little paint chip Christmas trees and using one of the inside pages on the cover looks fabulous .. a great background for all your bits and bobs! Absolutely gorgeous cover Lizzy and such a fun post!! Love it!!! xx
ReplyDeleteLove your cover Lizzy, looks fantastic
ReplyDeleteYou crack me up girl!! Your cover turned out wonderfully despite your dislike for fussy cutting 😄 Can't wait to see the progress xx
ReplyDeleteLove this Lizzy looks awesome!
ReplyDeleteGo Lizzy! I love your cover! great ideas about using the inside page, and love the washi and cute house and love the trees too.. and I LOVE LOVE LOVE fussy cutting!!! I look forward to seeing the pages come together!
ReplyDeleteLove love love love this! LOVING those trees!!!!!!!!!!!!!!
ReplyDelete